Chapter 10: Yes, that’s paint
Welcome back to the show! As is evidenced by the pictures you see here, there’s been a substantial bit of progress made and it’s time to make an update. The first thing you’ll notice is that I changed my mind about the color of the car. Big surprse there, huh? As of the previous chapter I was considering going with a weird BMW green color. Various events occurred and some amount of time passed and I finally settled on the color you see in these pictures. It’s called Pearl White Crystal Shine and is a standard color that Lexus offers on their 2002 models. The only real variation is the number of pearl coats. Here’s a big fat picture. (The BMW wheels are not mine, they are just there to fill the fenders out.)

Those are glass templates in the door and windshield which will be used to cut the glass we’ll be installing. In another picture you can see the template for the rear window – and will be able to tell the severe amount of curvature it requires. If we’re unable to get a piece of glass with that much curve in it we’ll have to resort to lexan or plexiglass. The external pieces missing from this mock up are the lid handles, trunk logo and driver’s door mirror. Other than those few things, this is as dressed up as it’ll get. The paint in this shot only has a rough buff on it and is sitting under three differently tinted flourescent lights. With final buffing and sitting out in the sun it will look amazing.
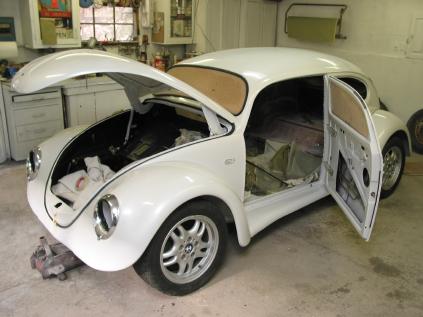
Both suicide doors are complete and man do they look good. We went with the 15lb solenoids from AutoLoc to pull the claws open and they are just right. Something else that came up during the finishing of the doors is that the regulators had to be slightly modified to avoid the hinges. The headlamp rings didn’t have anything to hang on on the fenders either so a small plate had to be screwed on to compensate.
The sharp eye may also pick out the modern touch added to the car: side markers. I was originally going to go with the amber lens, which would have been great on a darker color but, after settling on the white, needed to use the transparent/white lens. It makes quite a difference. By adding the marker it subtly gives the car a modern look without taking any of the original styling cues away (and those we’ve just exaggerated).
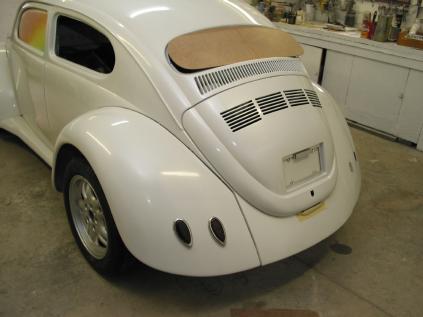
Here’s a shot of the back side too. As you can see, there’s not much to the back window and even our template doesn’t like the amount of curvature required. The ’39 Ford taillights give the car a bit of the hotrod look and feel that I’ve been going for and surprisingly they don’t look that much out of place back there. The cleaned up decklid and frenched in plate finish it off nicely.
As soon as the paint is finished up we’ll be trailering it down off the mountain and displacing the Cortina in the garage. Then it’s all meat and potatoes: new wiring harness, suspension, glass and interior before giving it an engine and tranny. Other juicy bits include headlights, stereo, hooking up the remote-entry system, possible electric windows and, of course, wheels and tires. I’m still looking at Colorado Custom for wheels and possibly a steering wheel to match. I’m not sure about which design though, there are way too many cool ones to choose from…
very nice … how long do fender conversions like this take. and how much would you say it cost.
Depends on how much money and time you want to spend on it. These were finished grey fiberglass fenders that I bought from “Innovations in Fiberglass”, now known by a different name but you can google them with that term. You could literally bolt these on to your bug, but they might not line up perfecly. We had to modify all 4 fenders as well as the running boards to get them all to match up to each other and the body.